Chimney relining is the most practical and affordable way to repair deteriorated or damaged chimneys.
Chimney liners are used to protect the inside of a masonry chimney from wear and tear caused by wet conditions. Moisture, over time, will cause decay and corrosion of mortar, clay, and brick liners. How? Moisture reacts with the exhaust gases to form an acid that slowly “eats away” at the chimney. Moisture also, can collect and seep into cracks, mortar and bricks. In colder climates, this moisture will freeze, expand and then thaw, thus causing chunks of the chimney to break and crumble.
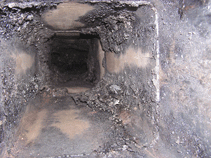
 As well as moisture…the other most common form of chimney damage is a chimney fire.
Photo of clay tile chimney liner after chimney fire.
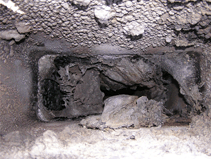
In addition to chimney damage, older chimneys may be unlined or their liners may be deteriorated to the point where relining is warranted.
Golden Flue chimney liner casting.
A cast masonry liner is installed after the removal of the old clay tile masonry liner. The tested chimney mix is pumped into the chimney casing and around a temporary deflateable chimney former.
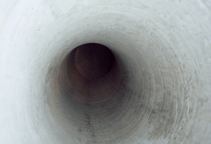
Golden Flue chimney liner completed casting.
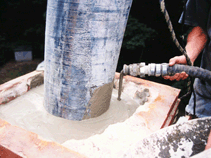
Note the smooth texture and the flow of the Golden Flue masonry lining mix being pumped into the chimney around the rubber chimney former. Note the spring spacers around the former. This device is what maintains the wall thickness of the cast liner throughout the entire length of the chimney system.
The temporary chimney former is removed and pulled out of the chimney after the chimney mix has set up.
 The end result is a round seamless liner system with no joints. The cast masonry liner has bonded to the inside walls of your chimney and stopped all further deterioration. At the same time it also has sealed any weak areas and any gaps or cracks in the chimney.
This is a complete fireproof masonry liner which looks like a well casing.
In most cases we install a short piece of conventional clay tile on top of the cast liner. This is so your chimney does not change any of its appearance prior to our relining of the flue.
To complete the job we install a new crown was on top of the entire chimney with same and mortar material.
If this chimney did not have a chimney cap we do recommend one. Water is the number one thing that causes masonry deterioration.
3 thoughts on “Chimney Relining”
Message: A home we purchased a year ago has cast-in-place liners on the two chimneys.
They appear to be in good shape but only have a diameter of just over 6 inches. There is a jog in each chimney in the attic portion so they are not straight vertical chimneys.
With such a small diameter in the Golden Flue installations, we are not able to figure out how to operate either a wood-burning or gas (propane) insert in these chimneys.
Is there a special way to attach the insert to the Golden Flue or do we need to run a stainless steel liner up through the cast-in- place liner?
So far the only option we have learned of is a B Vent liner which will suck the warm air out of the house and up the chimney; but, it is 4 inches in diameter.
We are having difficulty understanding how the cast-in- place liner is supposed to work with a 6 inch diameter and a gas or wood insert of some sort.
Please help!
Depending on the height of the chimney, and whether or not the smoke chamber itself is carved at a 45 degree angle from the face opening of the visible portion of the fireplace upwards to where it becomes the 6″+ sized flue, it may well be more than sufficient.
Properly carved (the smoke chamber) and sufficient height, would allow the flue size to be as much as 18-20: to 1 smaller than the cross section of the fireplace opening compared to clay tiles 10:1 or stainless steels 12-14: 1 sizing.
Ret (CSIA#3250)
Former Golden Flue Dealer/Installer
Hi Wendy,
You’ve run into the main problem with cast liners. Once in place there is nothing you can do when they fail or if you want to make a change other than to take the chimney down. About 25 years ago I made a set up to bore a poured liner out to 7″ but it only works on a straight chimney and is so difficult and time consuming that it’s usually cheaper to take the chimney down.
I assume that the 6″ pour was because someone wanted to install a wood insert into the fireplace. The problem there is how do you get the dripless connection from the base of the pour to the insert. I’ve never seen a correct way to accomplish it.
In your case you are stuck with wood pellet, B-vent gas, or there are some small direct vent gas inserts that use a 3×2 venting. I’d pull a test piece to make sure the 3×2 will fit past the offset before ordering anything. I’ve found many poured liners that got smaller at an offset.
good luck
Mark Jones
Chestnut Hill Chimney & Hearth NH
http://chestnuthillchimney.com/